Adding Storage Devices for Monitoring
ObserveOps (formerly known as AIOps) monitors storage devices by discovering them through a credential profile and provisioning them as monitors. Once provisioned, ObserveOps continuously collects performance metrics and generates alerts based on what it finds. You can customize Monitor Settings for each monitor, including polling intervals, thresholds, and alert notifications.
Storage Vendors Supported
| Vendor | Supported Models |
|---|---|
| NetApp | ONTAP |
| HPE | 3PAR, Primera, MSA, StoreOnce, Alletra |
| Dell | EMC Unity, EMC VNX, Compellent, Isilon NL410, PowerVault Storage Manager |
| IBM | IBM Storage |
| Huawei | Huawei Storage |
| Hitachi | Hitachi Storage |
| Fibrenetix | Fibrenetix |
| QNAP | QNAP NAS |
| QSAN | QSAN Storage |
| Synology | Synology NAS |
| Harmonic | Harmonic |
- NetApp ONTAP
- HPE StoreOnce
- HPE 3PAR
- HPE Primera
- HPE MSA
- Dell EMC Unity
- Dell EMC VNX Storage Processor
- Dell EMC VNX Control Station
- IBM FlashSystem5000
- Huawei OceanStor
- Hitachi VSP E Series
- Fibrenetix
- QNAP TS
- QSAN XCubeNXT
- Synology RS
- Harmonic ContentServer
- Harmonic ContentStore
- Dell Compellent
- Dell Isilon NL410
- HPE Alletra
- Dell PowerVault
Adding a NetApp ONTAP Device
ObserveOps supports discovery of Nodes, Server Virtual Machines (SVM), Logical Unit Numbers (LUN), Disks, and Pools. Discovery runs through the ONTAP cluster, which fetches details for all associated components.
Prerequisites
- The ONTAP device must be reachable from the ObserveOps server.
- The ONTAP API version must be 9.6 or higher.
1. Create a Credential Profile
Go to Menu. Select Settings  . Select Discovery Settings
  . Select Credential Profile. The Credential Profile screen opens. Select Create Credential Profile.
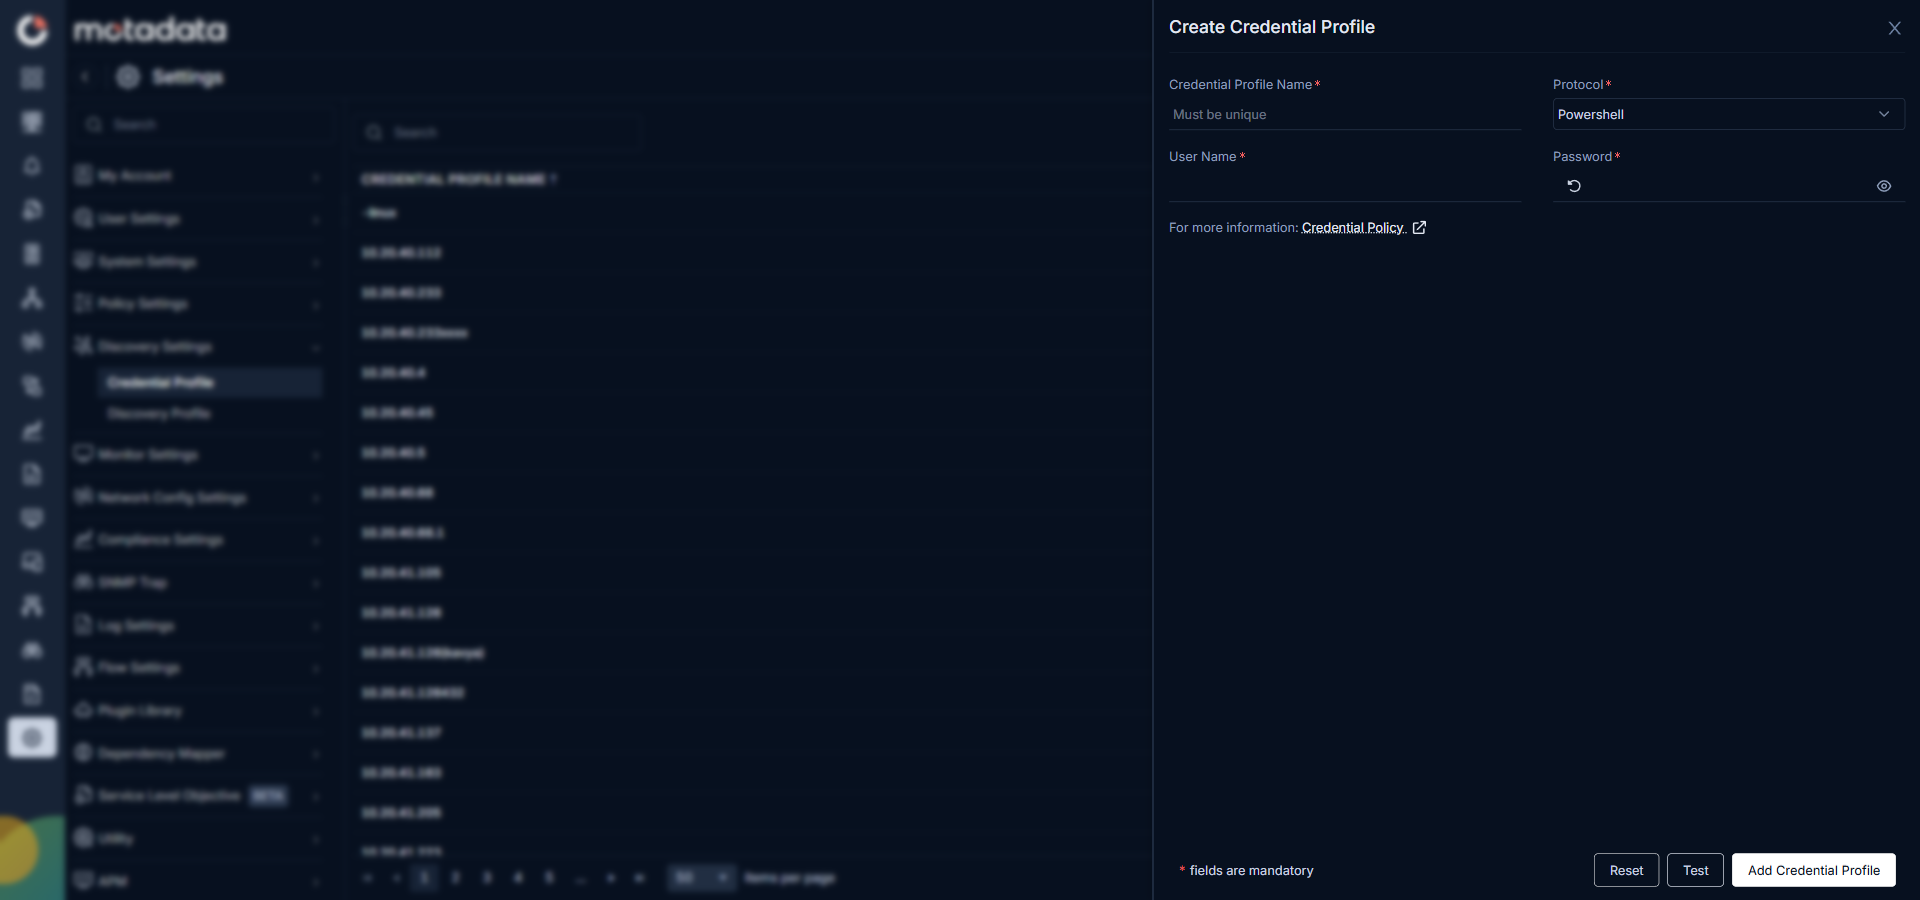
The Create Credential Profile form opens.
| Field | What to Enter |
|---|---|
| Credential Profile Name | A unique name to identify this profile |
| Protocol | Select HTTP/HTTPS |
| Username | The ONTAP cluster username |
| Password | The password for that account |
Select Test to verify the credentials connect to the device. Select Reset to clear all fields. Select Add Credential Profile to save.
2. Create a Discovery Profile
Go to Menu. Select Settings . Select Discovery Settings . Select Discovery Profile. The Discovery Profile screen opens. Select Create Discovery Profile.
The Create Discovery Profile form opens. Select Storage from the sidebar.
| Field | What to Enter |
|---|---|
| Discovery Profile Name | A unique name to identify this profile |
| IP / Host | The IP address of the ONTAP cluster |
| Collectors | One or more Collectors for data collection. If you skip this, ObserveOps selects a Collector automatically. |
| Vendor | Select NetApp |
| Device Model | Select NetApp ONTAP Cluster |
| Groups | One or more Groups to assign to provisioned monitors |
| Credential Profile | Select the NetApp ONTAP credential profile you just created |
| Tags | Tags to assign to discovered devices |
| Port | Pre-populated. No change needed. |
| URL Type | Select HTTPS (default) or HTTP |
| Ping Check | On by default. Toggle off to discover devices that don't respond to ping. |
| Notify Team | Email addresses, handles, or user profiles to notify when discovery completes |
Select Collectors based on how you want to distribute the monitoring load.
Select Save and Run to save and start discovery immediately. Select Save and Exit to save without running.
Adding an HPE StoreOnce Device
ObserveOps supports discovery of Local and Cloud storage, Disks, Volumes, and Service Sets through the HPE StoreOnce Controller.
Prerequisites
- The device must be reachable from the ObserveOps server.
- The StoreOnce appliance must run software version 4.x or newer. Versions 3.x and older are not supported.
1. Create a Credential Profile
Go to Menu. Select Settings . Select Discovery Settings . Select Credential Profile. The Credential Profile screen opens. Select Create Credential Profile.
The Create Credential Profile form opens.
| Field | What to Enter |
|---|---|
| Credential Profile Name | A unique name to identify this profile |
| Protocol | Select HTTP/HTTPS |
| Username | The HPE StoreOnce username |
| Password | The password for that account |
| Authentication Type | Select the authentication type configured on the device |
Select Test to verify the credentials connect to the device. Select Reset to clear all fields. Select Add Credential Profile to save.
2. Create a Discovery Profile
Go to Menu. Select Settings . Select Discovery Settings . Select Discovery Profile. The Discovery Profile screen opens. Select Create Discovery Profile.
The Create Discovery Profile form opens. Select Storage from the sidebar.
| Field | What to Enter |
|---|---|
| Discovery Profile Name | A unique name to identify this profile |
| IP / Host | The IP address of the HPE StoreOnce Controller |
| Collectors | One or more Collectors for data collection. If you skip this, ObserveOps selects a Collector automatically. |
| Vendor | Select HPE |
| Device Model | Select HPE StoreOnce |
| Groups | One or more Groups to assign to provisioned monitors |
| Credential Profile | Select the HPE StoreOnce credential profile you just created |
| Tags | Tags to assign to discovered devices |
| Port | Pre-populated. No change needed. |
| URL Type | Select HTTPS (default) or HTTP |
| Ping Check | On by default. Toggle off to discover devices that don't respond to ping. |
| Notify Team | Email addresses, handles, or user profiles to notify when discovery completes |
Select Collectors based on how you want to distribute the monitoring load.
Select Save and Run to save and start discovery immediately. Select Save and Exit to save without running.
Adding an HPE 3PAR Device
ObserveOps monitors HPE 3PAR storage devices, tracking storage utilization, disk health, port status, and system performance. This gives you early warning of capacity bottlenecks or hardware issues before they affect your workloads.
Prerequisites
- The HPE 3PAR device must be reachable from the ObserveOps server.
- Confirm the WSAPI server is running: SSH into the device and run
showwsapi. If it's not running, start it withstartwsapi(requires Super, Service, or a role withwsapi_setpermission). - Note the URL type and port from the
showwsapioutput. The default port is443. - Valid HTTP/HTTPS credentials for the device.
1. Create a Credential Profile
Go to Menu. Select Settings . Select Discovery Settings . Select Credential Profile. The Credential Profile screen opens. Select Create Credential Profile.
The Create Credential Profile form opens.
| Field | What to Enter |
|---|---|
| Credential Profile Name | A unique name to identify this profile |
| Protocol | Select HTTP/HTTPS |
| Username | The HPE 3PAR username |
| Password | The password for that account |
| Authentication Type | Select the authentication type configured on the device |
Select Test to verify the credentials connect to the device. Select Reset to clear all fields. Select Add Credential Profile to save.
2. Create a Discovery Profile
Go to Menu. Select Settings . Select Discovery Settings . Select Discovery Profile. The Discovery Profile screen opens. Select Create Discovery Profile.
The Create Discovery Profile form opens. Select Storage from the sidebar.
| Field | What to Enter |
|---|---|
| Discovery Profile Name | A unique name to identify this profile |
| IP / Host | The IP address of the HPE 3PAR device |
| Collectors | One or more Collectors for data collection. If you skip this, ObserveOps selects a Collector automatically. |
| Vendor | Select HPE |
| Device Model | Select HPE 3PAR |
| Groups | One or more Groups to assign to provisioned monitors |
| Credential Profile | Select the HPE 3PAR credential profile you just created |
| Tags | Tags to assign to discovered devices |
| Port | Pre-populated. No change needed. |
| URL Type | Select HTTPS (default) or HTTP |
| Ping Check | On by default. Toggle off to discover devices that don't respond to ping. |
| Notify Team | Email addresses, handles, or user profiles to notify when discovery completes |
Select Collectors based on how you want to distribute the monitoring load.
Select Save and Run to save and start discovery immediately. Select Save and Exit to save without running.
Adding an HPE Primera Device
ObserveOps monitors HPE Primera storage systems, tracking storage utilization, disk health, port status, and system performance. This helps you catch capacity bottlenecks or hardware issues before they affect dependent applications.
Prerequisites
- The HPE Primera device must be reachable from the ObserveOps server.
- Confirm the WSAPI server is running: SSH into the device and run
showwsapi. If it's not running, start it withstartwsapi(requires Super, Service, or a role withwsapi_setpermission). - Note the URL type and port from the
showwsapioutput. The default port is443. - Valid HTTP/HTTPS credentials for the device.
1. Create a Credential Profile
Go to Menu. Select Settings . Select Discovery Settings . Select Credential Profile. The Credential Profile screen opens. Select Create Credential Profile.
The Create Credential Profile form opens.
| Field | What to Enter |
|---|---|
| Credential Profile Name | A unique name to identify this profile |
| Protocol | Select HTTP/HTTPS |
| Username | The HPE Primera username |
| Password | The password for that account |
| Authentication Type | Select the authentication type configured on the device |
Select Test to verify the credentials connect to the device. Select Reset to clear all fields. Select Add Credential Profile to save.
2. Create a Discovery Profile
Go to Menu. Select Settings . Select Discovery Settings . Select Discovery Profile. The Discovery Profile screen opens. Select Create Discovery Profile.
The Create Discovery Profile form opens. Select Storage from the sidebar.
| Field | What to Enter |
|---|---|
| Discovery Profile Name | A unique name to identify this profile |
| IP / Host | The IP address of the HPE Primera device |
| Collectors | One or more Collectors for data collection. If you skip this, ObserveOps selects a Collector automatically. |
| Vendor | Select HPE |
| Device Model | Select HPE Primera |
| Groups | One or more Groups to assign to provisioned monitors |
| Credential Profile | Select the HPE Primera credential profile you just created |
| Tags | Tags to assign to discovered devices |
| Port | Pre-populated. No change needed. |
| URL Type | Select HTTPS (default) or HTTP |
| Ping Check | On by default. Toggle off to discover devices that don't respond to ping. |
| Notify Team | Email addresses, handles, or user profiles to notify when discovery completes |
Select Collectors based on how you want to distribute the monitoring load.
Select Save and Run to save and start discovery immediately. Select Save and Exit to save without running.
Adding an HPE MSA Device
ObserveOps monitors HPE MSA storage systems, giving you visibility into storage health, capacity, and performance across your infrastructure.
Prerequisites
- The HPE MSA device must be reachable from the ObserveOps server.
1. Create a Credential Profile
Go to Menu. Select Settings . Select Discovery Settings . Select Credential Profile. The Credential Profile screen opens. Select Create Credential Profile.
The Create Credential Profile form opens.
| Field | What to Enter |
|---|---|
| Credential Profile Name | A unique name to identify this profile |
| Protocol | Select HTTP/HTTPS |
| Username | The HPE MSA username |
| Password | The password for that account |
| Authentication Type | Select the authentication type configured on the device |
Select Test to verify the credentials connect to the device. Select Reset to clear all fields. Select Add Credential Profile to save.
2. Create a Discovery Profile
Go to Menu. Select Settings . Select Discovery Settings . Select Discovery Profile. The Discovery Profile screen opens. Select Create Discovery Profile.
The Create Discovery Profile form opens. Select Storage from the sidebar.
| Field | What to Enter |
|---|---|
| Discovery Profile Name | A unique name to identify this profile |
| IP / Host | The IP address of the HPE MSA device |
| Collectors | One or more Collectors for data collection. If you skip this, ObserveOps selects a Collector automatically. |
| Vendor | Select HPE |
| Device Model | Select HPE MSA |
| Groups | One or more Groups to assign to provisioned monitors |
| Credential Profile | Select the HPE MSA credential profile you just created |
| Tags | Tags to assign to discovered devices |
| Port | Pre-populated. No change needed. |
| URL Type | Select HTTPS (default) or HTTP |
| Ping Check | On by default. Toggle off to discover devices that don't respond to ping. |
| Notify Team | Email addresses, handles, or user profiles to notify when discovery completes |
Select Collectors based on how you want to distribute the monitoring load.
Select Save and Run to save and start discovery immediately. Select Save and Exit to save without running.
Adding a Dell EMC Unity Device
ObserveOps monitors Dell EMC Unity storage systems, tracking storage utilization, disk health, port status, and system performance to help you catch issues before they affect your infrastructure.
Prerequisites
- The Dell EMC Unity device must be reachable from the ObserveOps server.
- The Unity storage array must run firmware version 4.2 or higher.
Supported Models
| Model Series | Supported Models |
|---|---|
| All Flash | 350F, 450F, 550F, 650F |
| Hybrid | 300, 380, 400, 500, 600 |
1. Create a Credential Profile
Go to Menu. Select Settings . Select Discovery Settings . Select Credential Profile. The Credential Profile screen opens. Select Create Credential Profile.
The Create Credential Profile form opens.
| Field | What to Enter |
|---|---|
| Credential Profile Name | A unique name to identify this profile |
| Protocol | Select HTTP/HTTPS |
| Username | The Dell EMC Unity username |
| Password | The password for that account |
| Authentication Type | Select the authentication type configured on the device |
Select Test to verify the credentials connect to the device. Select Reset to clear all fields. Select Add Credential Profile to save.
2. Create a Discovery Profile
Go to Menu. Select Settings . Select Discovery Settings . Select Discovery Profile. The Discovery Profile screen opens. Select Create Discovery Profile.
The Create Discovery Profile form opens. Select Storage from the sidebar.
| Field | What to Enter |
|---|---|
| Discovery Profile Name | A unique name to identify this profile |
| IP / Host | The IP address of the Dell EMC Unity device |
| Collectors | One or more Collectors for data collection. If you skip this, ObserveOps selects a Collector automatically. |
| Vendor | Select Dell |
| Device Model | Select Dell EMC Unity |
| Groups | One or more Groups to assign to provisioned monitors |
| Credential Profile | Select the Dell EMC Unity credential profile you just created |
| Tags | Tags to assign to discovered devices |
| Port | Pre-populated. No change needed. |
| URL Type | Select HTTPS (default) or HTTP |
| Ping Check | On by default. Toggle off to discover devices that don't respond to ping. |
| Notify Team | Email addresses, handles, or user profiles to notify when discovery completes |
Select Collectors based on how you want to distribute the monitoring load.
Select Save and Run to save and start discovery immediately. Select Save and Exit to save without running.
Adding a Dell EMC VNX Storage Processor Device
ObserveOps monitors Dell EMC VNX Storage Processors, tracking storage utilization, disk health, port status, and system performance. Discovery uses NavisecCLI installed on the ObserveOps server.
Prerequisites
Install NavisecCLI on your ObserveOps server.
Download the Linux x64 NavisecCLI RPM from Dell Support to your local machine (Windows or Linux; either will work).
Copy the file to your ObserveOps server:
scp C:\Users\<your-user>\Downloads\NaviCLI-Linux-64-x86-en_US-7.33.21.3.22-3.x86_64.rpm ubuntu@<ObserveOps_SERVER_IP>:/tmp/noteReplace
<ObserveOps_SERVER_IP>with your ObserveOps server's IP address.On your ObserveOps Ubuntu server, download the CLI directly:
cd /tmp
wget https://dl.dell.com/downloads/XY9D7_Navisphere-CLI-7.33.21.3.22-for-Linux-x64.rpm
Convert the RPM to a DEB package using
alien, then install it:sudo apt update
sudo apt install alien -y
sudo alien -k /tmp/NaviCLI-Linux-64-x86-en_US-7.33.21.3.22-3.x86_64.rpm
sudo dpkg -i /tmp/navicli_7.33.21.3.22-3_amd64.debConfirm the install path (default is
/opt/Navisphere/bin):sudo find /opt -name naviseccliIf the path is
/opt/Navisphere/bin/naviseccli, add it permanently:echo 'export PATH=$PATH:/opt/Navisphere/bin' >> ~/.bashrc
source ~/.bashrcVerify the installation:
naviseccli -h
which naviseccli
For HA/DR deployments with three nodes, install NavisecCLI on all three nodes.
TCP port
6389must be open from the ObserveOps server to the Storage Processor.
Discover both Storage Processors (SPs) separately. This ensures continued data collection during failover.
1. Create a Credential Profile
Go to Menu. Select Settings . Select Discovery Settings . Select Credential Profile. The Credential Profile screen opens. Select Create Credential Profile.
The Create Credential Profile form opens.
| Field | What to Enter |
|---|---|
| Credential Profile Name | A unique name to identify this profile |
| Protocol | Select SSH |
| Username | The device username |
| Password | The password for that account |
| SSH Key and Passphrase | The SSH private key and passphrase if using key-based authentication |
| CLI Options | Optional. Select to configure Config Transfer Protocol, Enable User Name, Enable Password, Enable Command, and related CLI settings. |
Select Reset to clear all fields. Select Add Credential Profile to save.
2. Create a Discovery Profile
Go to Menu. Select Settings . Select Discovery Settings . Select Discovery Profile. The Discovery Profile screen opens. Select Create Discovery Profile.
The Create Discovery Profile form opens. Select Storage from the sidebar.
| Field | What to Enter |
|---|---|
| Discovery Profile Name | A unique name to identify this profile |
| IP / Host | The IP address of the Storage Processor |
| Collectors | One or more Collectors for data collection. If you skip this, ObserveOps selects a Collector automatically. |
| Vendor | Select Dell |
| Device Model | Select Dell EMC VNX Storage Processor |
| Groups | One or more Groups to assign to provisioned monitors |
| Credential Profile | Select the Dell EMC VNX credential profile you just created |
| Tags | Tags to assign to discovered devices |
| Port | Pre-populated. No change needed. |
| Ping Check | On by default. Toggle off to discover devices that don't respond to ping. |
| Notify Team | Email addresses, handles, or user profiles to notify when discovery completes |
Select Collectors based on how you want to distribute the monitoring load.
Select Save and Run to save and start discovery immediately. Select Save and Exit to save without running.
Adding a Dell EMC VNX Control Station Device
ObserveOps monitors Dell EMC VNX Control Stations, giving you visibility into storage health, performance, and capacity. Discovery uses SSH credentials.
Prerequisites
- Discover both Control Stations separately to ensure continued data collection during failover.
1. Create a Credential Profile
Go to Menu. Select Settings . Select Discovery Settings . Select Credential Profile. The Credential Profile screen opens. Select Create Credential Profile.
The Create Credential Profile form opens.
| Field | What to Enter |
|---|---|
| Credential Profile Name | A unique name to identify this profile |
| Protocol | Select SSH |
| Username | The device username |
| Password | The password for that account |
| SSH Key and Passphrase | The SSH private key and passphrase if using key-based authentication |
| CLI Options | Optional. Select to configure Config Transfer Protocol, Enable User Name, Enable Password, Enable Command, and related CLI settings. |
Select Reset to clear all fields. Select Add Credential Profile to save.
2. Create a Discovery Profile
Go to Menu. Select Settings . Select Discovery Settings . Select Discovery Profile. The Discovery Profile screen opens. Select Create Discovery Profile.
The Create Discovery Profile form opens. Select Storage from the sidebar.
| Field | What to Enter |
|---|---|
| Discovery Profile Name | A unique name to identify this profile |
| IP / Host | The IP address of the Control Station |
| Collectors | One or more Collectors for data collection. If you skip this, ObserveOps selects a Collector automatically. |
| Vendor | Select Dell |
| Device Model | Select Dell EMC VNX Storage Processor |
| Groups | One or more Groups to assign to provisioned monitors |
| Credential Profile | Select the Dell EMC VNX Control Station credential profile you just created |
| Tags | Tags to assign to discovered devices |
| Port | Pre-populated. No change needed. |
| Ping Check | On by default. Toggle off to discover devices that don't respond to ping. |
| Notify Team | Email addresses, handles, or user profiles to notify when discovery completes |
Select Collectors based on how you want to distribute the monitoring load.
Select Save and Run to save and start discovery immediately. Select Save and Exit to save without running.
Adding an IBM FlashSystem5000 Device
ObserveOps monitors IBM FlashSystem5000 storage systems, tracking storage utilization, disk health, port status, and system performance to help you detect capacity bottlenecks and hardware issues early.
Prerequisites
- The IBM FlashSystem5000 device must be reachable from the ObserveOps server.
1. Create a Credential Profile
Go to Menu. Select Settings . Select Discovery Settings . Select Credential Profile. The Credential Profile screen opens. Select Create Credential Profile.
The Create Credential Profile form opens.
| Field | What to Enter |
|---|---|
| Credential Profile Name | A unique name to identify this profile |
| Protocol | Select HTTP/HTTPS |
| Username | The IBM FlashSystem5000 username |
| Password | The password for that account |
Select Reset to clear all fields. Select Add Credential Profile to save.
2. Create a Discovery Profile
Go to Menu. Select Settings . Select Discovery Settings . Select Discovery Profile. The Discovery Profile screen opens. Select Create Discovery Profile.
The Create Discovery Profile form opens. Select Storage from the sidebar.
| Field | What to Enter |
|---|---|
| Discovery Profile Name | A unique name to identify this profile |
| IP / Host | The IP address of the IBM FlashSystem5000 |
| Collectors | One or more Collectors for data collection. If you skip this, ObserveOps selects a Collector automatically. |
| Vendor | Select IBM |
| Device Model | Select IBM FlashSystem5000 |
| Groups | One or more Groups to assign to provisioned monitors |
| Credential Profile | Select the IBM FlashSystem5000 credential profile you just created |
| Tags | Tags to assign to discovered devices |
| Port | Pre-populated. No change needed. |
| URL Type | Select HTTPS (default) or HTTP |
| Ping Check | On by default. Toggle off to discover devices that don't respond to ping. |
| Notify Team | Email addresses, handles, or user profiles to notify when discovery completes |
Select Collectors based on how you want to distribute the monitoring load.
Select Save and Run to save and start discovery immediately. Select Save and Exit to save without running.
Adding a Huawei OceanStor Device
ObserveOps supports discovery and monitoring of Huawei OceanStor arrays. Once provisioned, ObserveOps surfaces health, capacity, and performance metrics under Monitor > Storage.
Prerequisites
- The device must be reachable from the ObserveOps server.
- Supported models: 5300v3 and 6800v3
1. Create a Credential Profile
Go to Menu. Select Settings . Select Discovery Settings . Select Credential Profile. The Credential Profile screen opens. Select Create Credential Profile.
The Create Credential Profile form opens.
| Field | What to Enter |
|---|---|
| Credential Profile Name | A unique name to identify this profile |
| Protocol | Select SNMP V1/V2c or SNMP V3 based on your device configuration |
| Version (V1/V2c) | Select V1 or V2c and enter the Community and Write Community strings |
| Security User Name (V3) | The SNMP v3 username and Security Level |
Select Test to verify the credentials connect to the device. Select Reset to clear all fields. Select Add Credential Profile to save.
2. Create a Discovery Profile
Go to Menu. Select Settings . Select Discovery Settings . Select Discovery Profile. The Discovery Profile screen opens. Select Create Discovery Profile.
The Create Discovery Profile form opens. Select Storage from the sidebar.
| Field | What to Enter |
|---|---|
| Discovery Profile Name | A unique name to identify this profile |
| IP / Host | The management IP or hostname of the OceanStor array |
| Collectors | One or more Collectors for data collection. If you skip this, ObserveOps selects a Collector automatically. |
| Vendor | Select Huawei |
| Device Model | Select OceanStor |
| Groups | One or more Groups to assign to provisioned monitors |
| Credential Profile | Select the Huawei OceanStor credential profile you just created |
| Tags | Tags to assign to discovered devices |
| Port | Pre-populated. No change needed. |
| Retry Count | Number of retries before ObserveOps considers the device unreachable |
| Ping Check | On by default. Toggle off to discover devices that don't respond to ping. |
| Notify Team | Email addresses, handles, or user profiles to notify when discovery completes |
Select Collectors based on how you want to distribute the monitoring load.
Select Save and Run to save and start discovery immediately. Select Save and Exit to save without running.
Adding a Hitachi VSP E Series Device
ObserveOps monitors Hitachi VSP E Series devices, tracking storage capacity, performance, and system health to keep your storage environment running optimally.
Prerequisites
- The IP address must be the SVP (Service Processor) address.
- Supported models: 5300v3 and 6800v3
1. Create a Credential Profile
Go to Menu. Select Settings . Select Discovery Settings . Select Credential Profile. The Credential Profile screen opens. Select Create Credential Profile.
The Create Credential Profile form opens.
| Field | What to Enter |
|---|---|
| Credential Profile Name | A unique name to identify this profile |
| Protocol | Select HTTP/HTTPS |
| Username | The Hitachi VSP username |
| Password | The password for that account |
Select Reset to clear all fields. Select Add Credential Profile to save.
2. Create a Discovery Profile
Go to Menu. Select Settings . Select Discovery Settings . Select Discovery Profile. The Discovery Profile screen opens. Select Create Discovery Profile.
The Create Discovery Profile form opens. Select Storage from the sidebar.
| Field | What to Enter |
|---|---|
| Discovery Profile Name | A unique name to identify this profile |
| IP / Host | The SVP IP address |
| Collectors | One or more Collectors for data collection. If you skip this, ObserveOps selects a Collector automatically. |
| Vendor | Select Hitachi |
| Device Model | Select VSP E Series |
| Groups | One or more Groups to assign to provisioned monitors |
| Credential Profile | Select the Hitachi VSP credential profile you just created |
| Tags | Tags to assign to discovered devices |
| URL Type | Select HTTPS (default) or HTTP |
| Port | Pre-populated. No change needed. |
| Notify Team | Email addresses, handles, or user profiles to notify when discovery completes |
Select Collectors based on how you want to distribute the monitoring load.
Select Save and Run to save and start discovery immediately. Select Save and Exit to save without running.
Adding a Fibrenetix E88 Device
ObserveOps monitors Fibrenetix E88 devices, tracking storage capacity, performance, and system health.
Prerequisites
- The device must be reachable from the ObserveOps server.
- Supported model: Fibrenetix E88 12-BAY 2U
1. Create a Credential Profile
Go to Menu. Select Settings . Select Discovery Settings . Select Credential Profile. The Credential Profile screen opens. Select Create Credential Profile.
The Create Credential Profile form opens.
| Field | What to Enter |
|---|---|
| Credential Profile Name | A unique name to identify this profile |
| Protocol | Select SNMP V1/V2c or SNMP V3 based on your device configuration |
| Version (V1/V2c) | Select V1 or V2c and enter the Community and Write Community strings |
| Security User Name (V3) | The SNMP v3 username and Security Level |
Select Test to verify the credentials connect to the device. Select Reset to clear all fields. Select Add Credential Profile to save.
2. Create a Discovery Profile
Go to Menu. Select Settings . Select Discovery Settings . Select Discovery Profile. The Discovery Profile screen opens. Select Create Discovery Profile.
The Create Discovery Profile form opens. Select Storage from the sidebar.
| Field | What to Enter |
|---|---|
| Discovery Profile Name | A unique name to identify this profile |
| IP / Host | The IP address of the Fibrenetix E88 |
| Collectors | One or more Collectors for data collection. If you skip this, ObserveOps selects a Collector automatically. |
| Vendor | Select Fibrenetix |
| Device Model | Select E88 |
| Groups | One or more Groups to assign to provisioned monitors |
| Credential Profile | Select the Fibrenetix credential profile you just created |
| Tags | Tags to assign to discovered devices |
| Port | Pre-populated. No change needed. |
| Retry Count | Number of retries before ObserveOps considers the device unreachable |
| Ping Check | On by default. Toggle off to discover devices that don't respond to ping. |
| Notify Team | Email addresses, handles, or user profiles to notify when discovery completes |
Select Collectors based on how you want to distribute the monitoring load.
Select Save and Run to save and start discovery immediately. Select Save and Exit to save without running.
Adding a QNAP TS Device
ObserveOps monitors QNAP TS storage systems, giving you visibility into storage health, hardware status, capacity utilization, and overall system performance.
Prerequisites
- The device must be reachable from the ObserveOps server.
Supported Models
| Model Series | Supported Models |
|---|---|
| QNAP TS | TS-832PXU_RP |
1. Create a Credential Profile
Go to Menu. Select Settings . Select Discovery Settings . Select Credential Profile. The Credential Profile screen opens. Select Create Credential Profile.
The Create Credential Profile form opens.
| Field | What to Enter |
|---|---|
| Credential Profile Name | A unique name to identify this profile |
| Protocol | Select SNMP V1/V2c |
| Version | Select V1 or V2c |
| Community | The SNMP community string configured on the QNAP device |
| Write Community | Optional write community string |
Select Reset to clear all fields. Select Add Credential Profile to save.
2. Create a Discovery Profile
Go to Menu. Select Settings . Select Discovery Settings . Select Discovery Profile. The Discovery Profile screen opens. Select Create Discovery Profile.
The Create Discovery Profile form opens. Select Storage from the sidebar.
| Field | What to Enter |
|---|---|
| Discovery Profile Name | A unique name to identify this profile |
| IP / Host | The IP address of the QNAP device |
| Collector Type | Select the Collector Type |
| Collectors | One or more Collectors for data collection. If you skip this, ObserveOps selects a Collector automatically. |
| Vendor | Select QNAP |
| Device Model | Select QNAP TS |
| Groups | One or more Groups to assign to provisioned monitors |
| Credential Profile | Select the QNAP credential profile you just created |
| Tags | Tags to assign to discovered devices |
| Port | Defaults to 161. No change needed. |
| Retry Count | Number of retry attempts for device communication. Default is 1. |
| Ping Check | On by default. Toggle off to discover devices that don't respond to ping. |
| Notify Team | Email addresses, handles, or user profiles to notify when discovery completes |
Select Collectors based on how you want to distribute the monitoring load.
Select Save and Run to save and start discovery immediately. Select Save and Exit to save without running.
Adding a QSAN XCubeNXT Device
ObserveOps monitors QSAN storage systems, giving you visibility into hardware health, storage capacity, performance metrics, and system status to keep your storage infrastructure running reliably.
Prerequisites
- The device must be reachable from the ObserveOps server.
Supported Models
| Model Series | Supported Models |
|---|---|
| QSAN | XCubeNXT XN5112D |
1. Create a Credential Profile
Go to Menu. Select Settings . Select Discovery Settings . Select Credential Profile. The Credential Profile screen opens. Select Create Credential Profile.
The Create Credential Profile form opens.
| Field | What to Enter |
|---|---|
| Credential Profile Name | A unique name to identify this profile |
| Protocol | Select SNMP V1/V2c |
| Version | Select V1 or V2c |
| Community | The SNMP community string configured on the QSAN device |
| Write Community | Optional write community string |
Select Reset to clear all fields. Select Add Credential Profile to save.
2. Create a Discovery Profile
Go to Menu. Select Settings . Select Discovery Settings . Select Discovery Profile. The Discovery Profile screen opens. Select Create Discovery Profile.
The Create Discovery Profile form opens. Select Storage from the sidebar.
| Field | What to Enter |
|---|---|
| Discovery Profile Name | A unique name to identify this profile |
| IP / Host | The IP address of the QSAN device |
| Collector Type | Select the Collector Type |
| Collectors | One or more Collectors for data collection. If you skip this, ObserveOps selects a Collector automatically. |
| Vendor | Select QSAN |
| Device Model | Select XCubeNXT XN5112D |
| Groups | One or more Groups to assign to provisioned monitors |
| Credential Profile | Select the QSAN credential profile you just created |
| Tags | Tags to assign to discovered devices |
| Port | Defaults to 161. No change needed. |
| Retry Count | Number of retry attempts for communication. Default is 1. |
| Ping Check | On by default. Toggle off to discover devices that don't respond to ping. |
| Notify Team | Email addresses, handles, or user profiles to notify when discovery completes |
Select Collectors based on how you want to distribute the monitoring load.
Select Save and Run to save and start discovery immediately. Select Save and Exit to save without running.
Adding a Synology RS NAS Device
ObserveOps monitors Synology NAS systems, giving you visibility into hardware health, storage utilization, performance metrics, and system status to keep your storage reliable.
Prerequisites
- The device must be reachable from the ObserveOps server.
Supported Models
| Model Series | Supported Models |
|---|---|
| Synology RS | RS3618xs NAS |
1. Create a Credential Profile
Go to Menu. Select Settings . Select Discovery Settings . Select Credential Profile. The Credential Profile screen opens. Select Create Credential Profile.
The Create Credential Profile form opens.
| Field | What to Enter |
|---|---|
| Credential Profile Name | A unique name to identify this profile |
| Protocol | Select SNMP V1/V2c or SNMP V3 based on your device configuration |
| Version (V1/V2c) | Select V1 or V2c and enter the Community and Write Community strings |
| Security User Name (V3) | The SNMP v3 username and Security Level |
Select Test to verify the credentials connect to the device. Select Reset to clear all fields. Select Add Credential Profile to save.
2. Create a Discovery Profile
Go to Menu. Select Settings . Select Discovery Settings . Select Discovery Profile. The Discovery Profile screen opens. Select Create Discovery Profile.
The Create Discovery Profile form opens. Select Storage from the sidebar.
| Field | What to Enter |
|---|---|
| Discovery Profile Name | A unique name to identify this profile |
| IP / Host | The IP address of the Synology NAS device |
| Collector Type | Select the Collector Type |
| Collectors | One or more Collectors for data collection. If you skip this, ObserveOps selects a Collector automatically. |
| Vendor | Select Synology |
| Device Model | Select Synology RS |
| Groups | One or more Groups to assign to provisioned monitors |
| Credential Profile | Select the Synology credential profile you just created |
| Tags | Tags to assign to discovered devices |
| Port | Defaults to 161. No change needed. |
| Retry Count | Number of retry attempts for communication. Default is 1. |
| Ping Check | On by default. Toggle off to discover devices that don't respond to ping. |
| Notify Team | Email addresses, handles, or user profiles to notify when discovery completes |
Select Collectors based on how you want to distribute the monitoring load.
Select Save and Run to save and start discovery immediately. Select Save and Exit to save without running.
Adding a Harmonic ContentServer Device
ObserveOps monitors Harmonic ContentServer systems, giving you visibility into system health, storage performance, and operational status to keep your media and content delivery workflows running without interruption.
Prerequisites
- The device must be reachable from the ObserveOps server.
Supported Models
| Model Series | Supported Models |
|---|---|
| Harmonic ContentServer | MediaGrid ContentServer 4000A |
1. Create a Credential Profile
Go to Menu. Select Settings . Select Discovery Settings . Select Credential Profile. The Credential Profile screen opens. Select Create Credential Profile.
The Create Credential Profile form opens.
| Field | What to Enter |
|---|---|
| Credential Profile Name | A unique name to identify this profile |
| Protocol | Select SNMP V1/V2c or SNMP V3 based on your device configuration |
| Version (V1/V2c) | Select V1 or V2c and enter the Community and Write Community strings |
| Security User Name (V3) | The SNMP v3 username and Security Level |
Select Test to verify the credentials connect to the device. Select Reset to clear all fields. Select Add Credential Profile to save.
2. Create a Discovery Profile
Go to Menu. Select Settings . Select Discovery Settings . Select Discovery Profile. The Discovery Profile screen opens. Select Create Discovery Profile.
The Create Discovery Profile form opens. Select Storage from the sidebar.
| Field | What to Enter |
|---|---|
| Discovery Profile Name | A unique name to identify this profile |
| IP / Host | The IP address of the Harmonic ContentServer |
| Collector Type | Select the Collector Type |
| Collectors | One or more Collectors for data collection. If you skip this, ObserveOps selects a Collector automatically. |
| Vendor | Select Harmonic |
| Device Model | Select Harmonic ContentServer |
| Groups | One or more Groups to assign to provisioned monitors |
| Credential Profile | Select the Harmonic ContentServer credential profile you just created |
| Tags | Tags to assign to discovered devices |
| Port | Defaults to 161. No change needed. |
| Retry Count | Number of retry attempts. Default is 1. |
| Ping Check | On by default. Toggle off to discover devices that don't respond to ping. |
| Notify Team | Email addresses, handles, or user profiles to notify when discovery completes |
Select Collectors based on how you want to distribute the monitoring load.
Select Save and Run to save and start discovery immediately. Select Save and Exit to save without running.
Adding a Harmonic ContentStore Device
ObserveOps monitors Harmonic ContentStore systems, giving you visibility into system health, storage performance, and operational status to keep your media workflows uninterrupted.
Prerequisites
- The device must be reachable from the ObserveOps server.
Supported Models
| Model Series | Supported Models |
|---|---|
| Harmonic ContentStore | MediaGrid-ContentStore 4240A, MediaGrid-ContentStore 5840A |
1. Create a Credential Profile
Go to Menu. Select Settings . Select Discovery Settings . Select Credential Profile. The Credential Profile screen opens. Select Create Credential Profile.
The Create Credential Profile form opens.
| Field | What to Enter |
|---|---|
| Credential Profile Name | A unique name to identify this profile |
| Protocol | Select SNMP V1/V2c or SNMP V3 based on your device configuration |
| Version (V1/V2c) | Select V1 or V2c and enter the Community and Write Community strings |
| Security User Name (V3) | The SNMP v3 username and Security Level |
Select Test to verify the credentials connect to the device. Select Reset to clear all fields. Select Add Credential Profile to save.
2. Create a Discovery Profile
Go to Menu. Select Settings . Select Discovery Settings . Select Discovery Profile. The Discovery Profile screen opens. Select Create Discovery Profile.
The Create Discovery Profile form opens. Select Storage from the sidebar.
| Field | What to Enter |
|---|---|
| Discovery Profile Name | A unique name to identify this profile |
| IP / Host | The IP address of the Harmonic ContentStore |
| Collector Type | Select the Collector Type |
| Collectors | One or more Collectors for data collection. If you skip this, ObserveOps selects a Collector automatically. |
| Vendor | Select Harmonic |
| Device Model | Select Harmonic ContentStore |
| Groups | One or more Groups to assign to provisioned monitors |
| Credential Profile | Select the Harmonic ContentStore credential profile you just created |
| Tags | Tags to assign to discovered devices |
| Port | Defaults to 161. No change needed. |
| Retry Count | Number of retry attempts. Default is 1. |
| Ping Check | On by default. Toggle off to discover devices that don't respond to ping. |
| Notify Team | Email addresses, handles, or user profiles to notify when discovery completes |
Select Collectors based on how you want to distribute the monitoring load.
Select Save and Run to save and start discovery immediately. Select Save and Exit to save without running.
Adding a Dell Compellent Device
ObserveOps monitors Dell Compellent storage systems, giving you visibility into volume capacity, controller performance, disk health, and port status across your storage infrastructure.
Prerequisites
- The Dell Compellent device must be reachable from the ObserveOps server.
- Valid HTTP/HTTPS credentials for the device.
1. Create a Credential Profile
Go to Menu. Select Settings . Select Discovery Settings . Select Credential Profile. The Credential Profile screen opens. Select Create Credential Profile.
The Create Credential Profile form opens.
| Field | What to Enter |
|---|---|
| Credential Profile Name | A unique name to identify this profile |
| Protocol | Select HTTP/HTTPS |
| Username | The Dell Compellent username |
| Password | The password for that account |
| Authentication Type | Select the authentication type configured on the device |
Select Test to verify the credentials connect to the device. Select Reset to clear all fields. Select Add Credential Profile to save.
2. Create a Discovery Profile
Go to Menu. Select Settings . Select Discovery Settings . Select Discovery Profile. The Discovery Profile screen opens. Select Create Discovery Profile.
The Create Discovery Profile form opens. Select Storage from the sidebar.
| Field | What to Enter |
|---|---|
| Discovery Profile Name | A unique name to identify this profile |
| IP / Host | The IP address of the Dell Compellent storage system |
| Collectors | One or more Collectors for data collection. If you skip this, ObserveOps selects a Collector automatically. |
| Vendor | Select Dell |
| Device Model | Select Compellent |
| Groups | One or more Groups to assign to provisioned monitors |
| Credential Profile | Select the Dell Compellent credential profile you just created |
| Tags | Tags to assign to discovered devices |
| Port | Pre-populated. No change needed. |
| URL Type | Select HTTPS (default) or HTTP |
| Ping Check | On by default. Toggle off to discover devices that don't respond to ping. |
| Notify Team | Email addresses, handles, or user profiles to notify when discovery completes |
Select Collectors based on how you want to distribute the monitoring load.
Select Save and Run to save and start discovery immediately. Select Save and Exit to save without running.
Adding a Dell Isilon NL410 Device
ObserveOps monitors Dell Isilon NL410 scale-out NAS systems, giving you visibility into cluster health, node performance, NFS and SMB protocol throughput, storage pool capacity, and SyncIQ replication status.
Prerequisites
- The Dell Isilon NL410 cluster must be reachable from the ObserveOps server.
- Valid HTTP/HTTPS credentials for the cluster.
1. Create a Credential Profile
Go to Menu. Select Settings . Select Discovery Settings . Select Credential Profile. The Credential Profile screen opens. Select Create Credential Profile.
The Create Credential Profile form opens.
| Field | What to Enter |
|---|---|
| Credential Profile Name | A unique name to identify this profile |
| Protocol | Select HTTP/HTTPS |
| Username | The Dell Isilon username |
| Password | The password for that account |
| Authentication Type | Select the authentication type configured on the device |
Select Test to verify the credentials connect to the device. Select Reset to clear all fields. Select Add Credential Profile to save.
2. Create a Discovery Profile
Go to Menu. Select Settings . Select Discovery Settings . Select Discovery Profile. The Discovery Profile screen opens. Select Create Discovery Profile.
The Create Discovery Profile form opens. Select Storage from the sidebar.
| Field | What to Enter |
|---|---|
| Discovery Profile Name | A unique name to identify this profile |
| IP / Host | The IP address of the Dell Isilon cluster management node |
| Collectors | One or more Collectors for data collection. If you skip this, ObserveOps selects a Collector automatically. |
| Vendor | Select Dell |
| Device Model | Select Isilon |
| Groups | One or more Groups to assign to provisioned monitors |
| Credential Profile | Select the Dell Isilon credential profile you just created |
| Tags | Tags to assign to discovered devices |
| Port | Pre-populated. No change needed. |
| URL Type | Select HTTPS (default) or HTTP |
| Ping Check | On by default. Toggle off to discover devices that don't respond to ping. |
| Notify Team | Email addresses, handles, or user profiles to notify when discovery completes |
Select Collectors based on how you want to distribute the monitoring load.
Select Save and Run to save and start discovery immediately. Select Save and Exit to save without running.
Adding an HPE Alletra Device
ObserveOps monitors HPE Alletra all-NVMe storage systems, giving you visibility into volume capacity and performance, controller health, NVMe drive endurance, and replication status.
Prerequisites
- The HPE Alletra device must be reachable from the ObserveOps server.
- Valid HTTP/HTTPS credentials for the device.
1. Create a Credential Profile
Go to Menu. Select Settings . Select Discovery Settings . Select Credential Profile. The Credential Profile screen opens. Select Create Credential Profile.
The Create Credential Profile form opens.
| Field | What to Enter |
|---|---|
| Credential Profile Name | A unique name to identify this profile |
| Protocol | Select HTTP/HTTPS |
| Username | The HPE Alletra username |
| Password | The password for that account |
| Authentication Type | Select the authentication type configured on the device |
Select Test to verify the credentials connect to the device. Select Reset to clear all fields. Select Add Credential Profile to save.
2. Create a Discovery Profile
Go to Menu. Select Settings . Select Discovery Settings . Select Discovery Profile. The Discovery Profile screen opens. Select Create Discovery Profile.
The Create Discovery Profile form opens. Select Storage from the sidebar.
| Field | What to Enter |
|---|---|
| Discovery Profile Name | A unique name to identify this profile |
| IP / Host | The IP address of the HPE Alletra storage system |
| Collectors | One or more Collectors for data collection. If you skip this, ObserveOps selects a Collector automatically. |
| Vendor | Select HPE |
| Device Model | Select Alletra |
| Groups | One or more Groups to assign to provisioned monitors |
| Credential Profile | Select the HPE Alletra credential profile you just created |
| Tags | Tags to assign to discovered devices |
| Port | Pre-populated. No change needed. |
| URL Type | Select HTTPS (default) or HTTP |
| Ping Check | On by default. Toggle off to discover devices that don't respond to ping. |
| Notify Team | Email addresses, handles, or user profiles to notify when discovery completes |
Select Collectors based on how you want to distribute the monitoring load.
Select Save and Run to save and start discovery immediately. Select Save and Exit to save without running.
Adding a Dell PowerVault Storage Manager Device
ObserveOps monitors Dell PowerVault Storage Manager systems, giving you visibility into volume capacity, controller health, disk status, and port performance across your storage infrastructure.
Prerequisites
- Make sure the device is reachable from the ObserveOps server.
- If the primary controller IP becomes unreachable, discover the storage system again using the secondary controller's IP address and valid credentials.
If both storage controllers are discovered simultaneously, it may result in data inconsistencies, duplicate alerts, duplicate policies, and duplicate reports due to differences in the polling intervals of each controller.
Supported Models
| Model Series | Supported Models |
|---|---|
| PowerVault ME5 | ME 5024 |
1. Create a Credential Profile
Go to Menu. Select Settings . Select Discovery Settings . Select Credential Profile. The Credential Profile screen opens. Select Create Credential Profile.
The Create Credential Profile form opens.
| Field | What to Enter |
|---|---|
| Credential Profile Name | A unique name to identify this profile |
| Protocol | Select HTTP/HTTPS |
| Username | The Dell PowerVault username |
| Password | The password for that account |
| Authentication Type | Select the authentication type configured on the device |
Select Test to verify the credentials connect to the device. Select Reset to clear all fields. Select Add Credential Profile to save.
2. Create a Discovery Profile
Go to Menu. Select Settings . Select Discovery Settings . Select Discovery Profile. The Discovery Profile screen opens. Select Create Discovery Profile.
The Create Discovery Profile form opens. Select Storage from the sidebar.
| Field | What to Enter |
|---|---|
| Discovery Profile Name | A unique name to identify this profile |
| IP / Host | The IP address of the Dell PowerVault Storage Manager |
| Collectors | One or more Collectors for data collection. If you skip this, ObserveOps selects a Collector automatically. |
| Vendor | Select Dell |
| Device Model | Select PowerVault Storage Manager |
| Groups | One or more Groups to assign to provisioned monitors |
| Credential Profile | Select the Dell PowerVault credential profile you just created |
| Tags | Tags to assign to discovered devices |
| Port | Pre-populated. No change needed. |
| URL Type | Select HTTPS (default) or HTTP |
| Ping Check | On by default. Toggle off to discover devices that don't respond to ping. |
| Notify Team | Email addresses, handles, or user profiles to notify when discovery completes |
Select Collectors based on how you want to distribute the monitoring load.
Select Save and Run to save and start discovery immediately. Select Save and Exit to save without running.
3. Provision the Discovered Devices as Monitors
After the discovery run completes, ObserveOps shows all discovered storage devices. Select the ones you want to add as Monitors.
Select Add Selected Objects to provision the selected devices as monitors. ObserveOps now collects metrics continuously.
To view the monitors, go to Menu. Select Monitor. Select Storage.